DHCP Operation and DHCP Server Setup on Cisco IOS
It’s always fun to know how things we use daily work on a lower level. DHCP is one of these things many of us use on a daily basis and yet we probably don’t know so much about it or at least don’t really think about it. I’ll summarise some bits and pieces about this protocol and how DHCP opertion usually works, plus I’ll set it up using a Cisco IOS on a Cisco 1841 router.
Note at the beginning: Cisco 1841 router is not any new technology. It’s not supported by Cisco anymore, the support was discontinued in 2016. However, I’m using this device for my home lab for two main reasons: 1) Cisco devices are faily expensive since they are geared towards corporate use, 2) having an older device is not a problem for my learning purposes, my home lab is no production environment, nothing where only new technology matters. Anyway, it basically means some of the procedures shown in here might be different in new devices and with new versions of IOS. The basics hopefully still stay the same (at least as of 2020). If you want a newer device to practise on, Cisco recommends 1921 router as a successor of 1841. This 1921 device is not produced anymore, but the support should last till 2023, which is still a couple of years from now. And a used 1921 costs about 200 dollars, which is bearable.
Let’s start with the server side, then I’ll use a client to connect to this network and use a DHCP to obtain an IP address. I’ll capture this in tcpdump in order to see how it all works on the protocol level.
Server
My router device has these ports:
table#sh ip int brief
Interface                  IP-Address      OK? Method Status                Protocol
FastEthernet0/0            100.1.1.1       YES manual administratively down down
FastEthernet0/1            10.0.1.1        YES NVRAM  administratively down down
Serial0/1/0                unassigned      YES NVRAM  administratively down down
Serial0/1/1                unassigned      YES NVRAM  administratively down down
So far, I’ve played with FastEthernet0/0 port, but shut it down so I can show the whole process from the beginning. I won’t, however, show how to set up an IP address and mask on the port itself, that’s not really that much related to a DHCP which is my concern in this article.
I’ll leave the port down for a bit and move on to set up a DHCP server on this Cisco device. The process in a human language looks something very much like this:
1) determine what IP addresses should not be assigned to hosts, these will be excluded from the IP address pool 2) create a new IP address pool, that means assigning a name to it 3) configure what network the pool from point 2) is for, configuring a default gateway IP address, dns server IP address, and other parameters such as lease time
In IOS, I’ll configure these steps as follows:
table>en
table#conf t
table(config)#ip dhcp excluded-address 100.1.1.1 100.1.1.1
That’s step one in my situation, I want to exclude only one IP address from the poll I’m going to create now:
table(config)#ip dhcp pool table-router-dhcp-2
A faily bad name, but it will do for now :)
I’ll specify what network this DHCP is for:
table(dhcp-config)#network 100.1.1.0 255.255.255.240
and what the default gateway is:
table(dhcp-config)#default-router 100.1.1.1
Finally, I’ll configure a lease of 1 day for all assigned IP addresses:
table(dhcp-config)#lease 1
That should all be done, let’s verify I’ve done what I wanted. I’ll return to a privileged mode and see the current running config, which I have shortened here, so you can focus on only the DHCP part:
...
!
!
ip dhcp excluded-address 100.1.1.1
!
ip dhcp pool table-router-dhcp-2
 network 100.1.1.0 255.255.255.240
 default-router 100.1.1.1
!
!
...
Then I’ll bring up the f0/0 interface:
table#conf t
Enter configuration commands, one per line.  End with CNTL/Z.
table(config)#int f0/0
table(config-if)#no shutdown
And check it’s up and running:
table#sh ip int brief
Interface                  IP-Address      OK? Method Status                Protocol
FastEthernet0/0            100.1.1.1       YES manual up                    up
FastEthernet0/1            10.0.1.1        YES NVRAM  administratively down down
Serial0/1/0                unassigned      YES NVRAM  administratively down down
Serial0/1/1                unassigned      YES NVRAM  administratively down down
You can also see more details by typing table#sh ip int f0/0 (shortened output):
table#sh ip int f0/0
FastEthernet0/0 is up, line protocol is up
  Internet address is 100.1.1.1/28
  Broadcast address is 255.255.255.255
  Address determined by setup command
  ...
Client
Now I want to physically connect my client and the Cisco device, configure the client in a way it will use a DHCP, and capture packets on the network, so I can see what’s going on.
On many user devices, DHCP is sort of a default in many cases, or it could be easily done via some graphical software, e.g. in Manjaro, there’s a NetworkManager Applet for managing your network devices and connections. Configuring DHCP should be fairly quick.
However, let’s also use tcpdump for packet capturing, I’ll save everything into a file:
# tcpdump -i eth0 -w dhcp_cisco_capture
Then, I’ll bring up the eth0 interface of my laptop and wait a bit until I get an IP address:
$ ifconfig
eth0: flags=67<UP,BROADCAST,RUNNING>  mtu 1500
        inet 100.1.1.2  netmask 255.255.255.240  broadcast 100.1.1.15
        ether 20:47:47:cc:ac:7f  txqueuelen 1000  (Ethernet)
        RX packets 6576  bytes 9159636 (8.7 MiB)
        RX errors 0  dropped 0  overruns 0  frame 0
        TX packets 3547  bytes 269166 (262.8 KiB)
        TX errors 0  dropped 0 overruns 0  carrier 0  collisions 0
        device interrupt 20  memory 0xf7300000-f7320000
It might take a bit longer for the first time for the process of obtaining a IP address for the first time takes a bit longer than later on. But let’s see that. I’ll stop tcpdump and see open the capture file (dhcp_cisco_capture) in wireshark.

First off, I’ve filtered out anything but DHCP and ARP protocols. Then I can see a sequence of: DHCP Request => DHCP NAK => DHCP Discover => ARP from the Cisco => DHCP Offer => DHCP Request => DHCP ACK.
Let’s break this down a bit:
First DHCP Request actually looks like this:
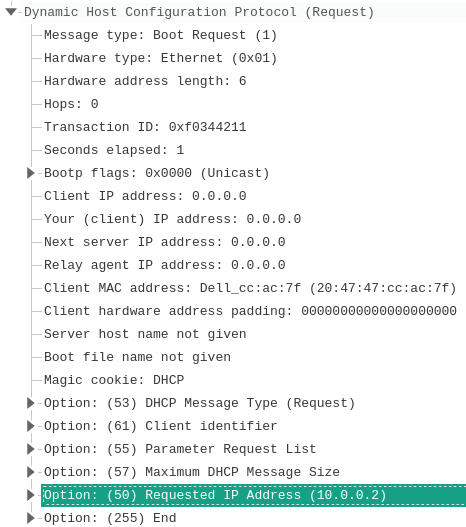
It’s coming from my laptop, it’s a broadcast message, but you can also see the field Requested IP Address is filled in. It turns out that my laptop remembers the previous configuration, so it’s now asking for the last IP address it used. However, the server replies with DHCP NAK because 10.0.0.2 is not on the same network as 100.1.1.0/28:
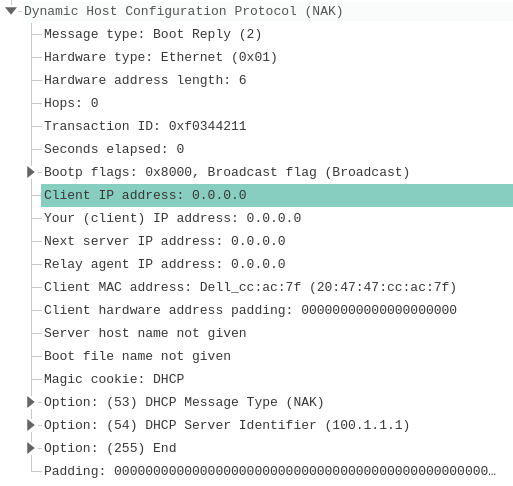
So the server is basically saying “no, you can’t use this IP address on this network”.
Actually, these two first steps are not usually described when you have a look at e.g. Wikipedia. That’s because they do not need to happen, this is more (I guess) about how the client is configured, in my case, though, the client starts by asking for the same IP address it previously used. My wild guess is this might occur more often than not, so that’s why I started with it.
Another side note is: DHCP is built on top of UDP, it uses port 68 on the client side and port 67 on the server side.
Alright, let’s move on.
Since the client’s request was declined, the client now has to resolve the situation in another way. It will start from scratch and send DHCP Discover broadcast message:
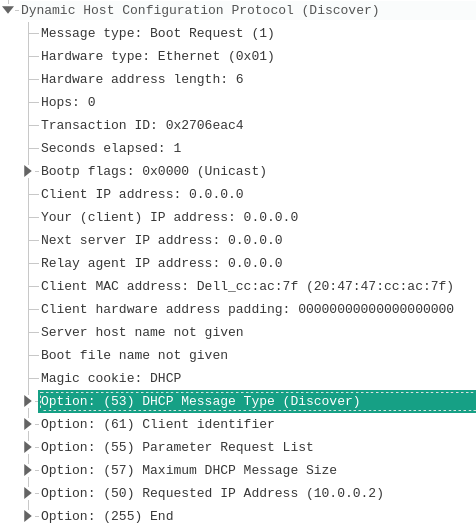
You can see that Requested IP Address is still filled in with the wrong (previous) IP address, but the type of this message has changed (it’s DHCP Discover, not DHCP Request anymore).
After the server processes the message, it will not reply straight away, it will do the following:
- check the local pool
- check that an IP from the pool is not assigned yet
The second step is where ICMP protocol and ping comes into play. The default number of ping packets is 2, so if no ICMP response comes within these 2 packets, the router will assume it’s safe to assing such an IP address, otherwise it’ll delete the IP address from the pool in order to avoid conflicts (same IP addresses on the network). However, there’s no ICMP packet in the capture. Well, it has something to do with the fact that the router doesn’t know where to send the frame with the ICMP packet wrapped inside, so it has to use ARP in the hope it will map the IP address to a hardware address. However, it will never happen, so in turn there’ll be no ICMP traffic in the capture.
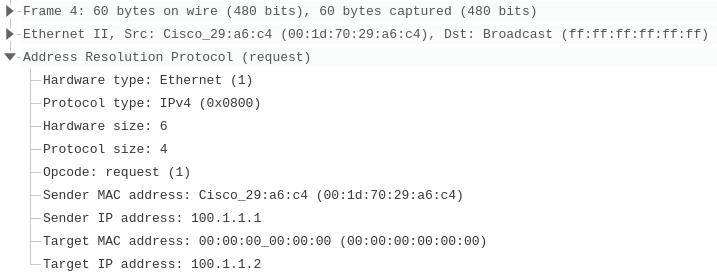
No response for pings (well, no pings in the first place) came, so the router assumes this IP is safe (not used yet) and sends a DHCP Offer with this very IP address:
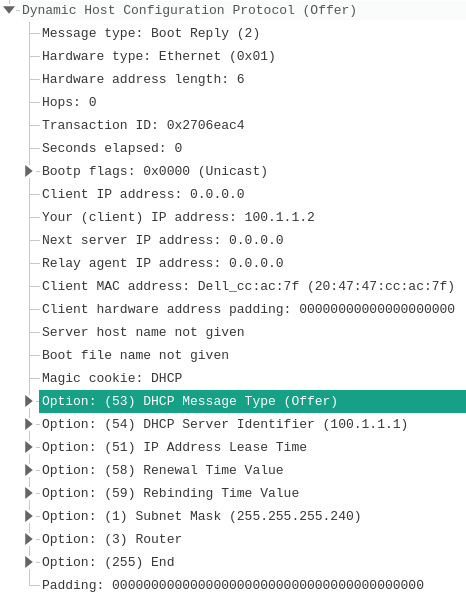
If you by any chance want to change the default value of pings, it could be done:
table(config)#ip dhcp ping packets 1
If you choose 0, the router won’t try to check whether an address from the pool already exists on the network. You will save some traffic and make the assignment process faster, but you’re running the risk that there’ll be conflicts.
It might seem this is the end, but there’re two more steps. One is that the client sends another DHCP Request broadcast message, this time, there’s a different Requested IP Address, that’s the one the client received as part of the previous DHCP Offer:
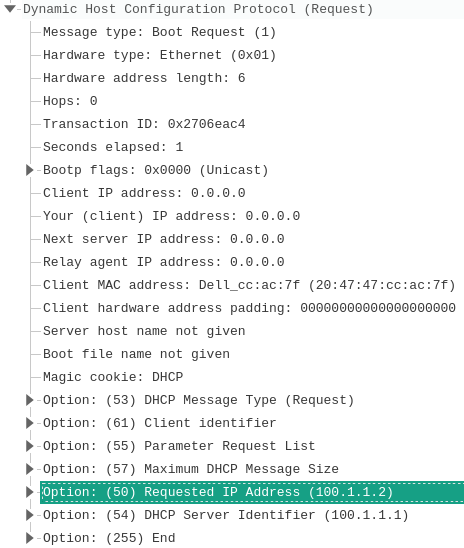
And finally the server processes this request and sends a final confirmation in the form of DHCP ACK:
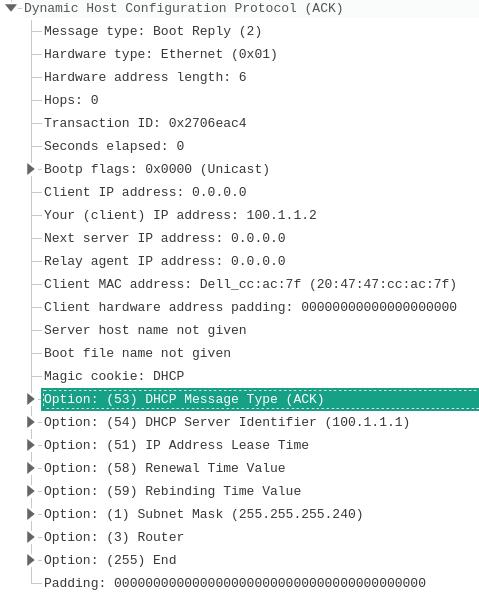
At this point, the client can usually start using such an IP address and operate on the network. I can also check the lease time, which should be 1 day (previously configured on the server):

Of course, this field was sent even in previous DHCP messages.
To sum it up, the standard DHCP process looks like this: DHCP Discover => ARPing => DHCP Offer => DHCP Request => DHCP ACK. However, when a client remembers the last used IP address but is now e.g. connecting to a different network, it looks like this: DHCP Request => DHCP NAK => DHCP Discover => ARPing => DHCP Offer => DHCP Request => DHCP ACK. On the other hand, if the first DHCP Request could be satisfied, the whole process looks like this:

There’s no need to go through the whole discovery.
Server side again
Let’s see the server side once again. There’re a few commands I can use to see what’s going on with the DHCP:
table#sh ip dhcp ?
  binding   DHCP address bindings
  conflict  DHCP address conflicts
  database  DHCP database agents
  import    Show Imported Parameters
  pool      DHCP pools information
  relay     Miscellaneous DHCP relay information
  server    Miscellaneous DHCP server information
Notice the handy ? that complete my chain of commands, it’s useful when I don’t remember what the command is or what comes next.
These are the options I can see, e.g. when I type pool, something like this is presented:
table#sh ip dhcp pool

Pool table-router-dhcp-2 :
 Utilization mark (high/low)    : 100 / 0
 Subnet size (first/next)       : 0 / 0
 Total addresses                : 14
 Leased addresses               : 1
 Pending event                  : none
 1 subnet is currently in the pool :
 Current index        IP address range                    Leased addresses
 100.1.1.3            100.1.1.1        - 100.1.1.14        1
I can see the IP address range, the current index, number of leased addresses, etc.
Or I can see server statistics:
table#sh ip dhcp server statistics
Memory usage         57224
Address pools        2
Database agents      0
Automatic bindings   1
Manual bindings      0
Expired bindings     0
Malformed messages   0
Secure arp entries   0

Message              Received
BOOTREQUEST          0
DHCPDISCOVER         2
DHCPREQUEST          7
DHCPDECLINE          0
DHCPRELEASE          0
DHCPINFORM           0

Message              Sent
BOOTREPLY            0
DHCPOFFER            2
DHCPACK              5
DHCPNAK              1
Note that these are a bit messed up since I connected to the network more times, so the numbers do not comply with what I’ve shows so far. But you can reset the statistics by typing: clear ip dhcp server statistics in the privileged mode. Then, the numbers will be down to 0 again:
table#sh ip dhcp server statistics
Memory usage         56965
Address pools        2
Database agents      0
Automatic bindings   0
Manual bindings      0
Expired bindings     0
Malformed messages   0
Secure arp entries   0

Message              Received
BOOTREQUEST          0
DHCPDISCOVER         0
DHCPREQUEST          0
DHCPDECLINE          0
DHCPRELEASE          0
DHCPINFORM           0

Message              Sent
BOOTREPLY            0
DHCPOFFER            0
DHCPACK              0
DHCPNAK              0
If I want to delete all bindings, so my client goes through the process of discovery again next time, I’ll type:
table#clear ip dhcp binding *
Note that * means all. But you can choose just some.
And when I see the pool again, there’re no leased addresses anymore:
table#sh ip dhcp pool

Pool table-router-dhcp-2 :
 Utilization mark (high/low)    : 100 / 0
 Subnet size (first/next)       : 0 / 0
 Total addresses                : 14
 Leased addresses               : 0
 Pending event                  : none
 1 subnet is currently in the pool :
 Current index        IP address range                    Leased addresses
 100.1.1.1            100.1.1.1        - 100.1.1.14        0
And so the client’s request for 100.1.1.2 won’t be satisfied the next time and the client will send a DHCP Discover message. The whole process would look like this:

Conclusion
That’s all for now. I’m sure there’s much more to this topic, but this should be enough to understand the basic process of how DHCP works. Setting it up myself on the server makes me see it from a different perspective, which further promotes learning. On top of that, I practised (after a long time) some IOS commands and checked that my Cisco router is still functional :)